J74 Morph - Setup and FAQ page
[1] - How can I get the TrackMorph device to work properly?
To work properly, Track Morph needs to be added as the last device in order of time for the track and at its rightmost side. At the moment you drop TrackMorph, the plugin will initialize mappings to the other devices in the track. These associations will be saved if you save the liveset (if you save and reopen the set, mappings will keep working). Anyway if you add/move devices after TrackMorph was already inserted in the track, TrackMorph will not be able to associate to them correctly.

If for instance you drop in the following order: an EQ8, a Chorus, the TrackMorph plugin and a Compressor (even if Track Morph is set to the rightmost spot), TrackMorph will only map to the EQ8 and the Chorus, but not to the Compressor (because added later in time than the TrackMorph). If instead you add them in this order: EQ8, Chorus, Compressor and as the last one in order of time (at to the rightmost spot) TrackMorph, all mappings will be done correctly. The recommendation is therefore to drop the TrackMorph device only when your track chain is "stable" for you to add snapshots and morphing.
[2] - How can I get the PresetMorph device to work properly?
The way of getting PresetMorph to properly operate is very similar to case described for TrackMorph. To work correctly, PresetMorph needs to be dropped at the right of the target device (e.g. an EQ8) and after the target device was already placed in the track (in order of time).

The following is the correct order for the initial setup:
1) Drop the target device (e.g, an EQ8).
2) Drop THEN PresetMorph, to the right of the target device (EQ8 in this example).
From now on you can work as you would expect: operate changes to the target device (EQ8), store/recall/morph snapshots and so on.
Notes:
If you invert 1) and 2) Preset Morph will not map to the device.
If you move Preset Morph around in the Liveset after doing correctly 1) and 2) above, Preset Morph will still map to the target device in 1).
For instance you did map it with 1) and 2) to a Filter Delay, then moved Preset Morph to another track behind an EQ8: PresetMorph will continue mapping to Filter Delay. For a new target device, drop a new Preset Morph (as in steps 1) and 2) above.
[3] - How can I work with a VST or AU plugin as target device?
PresetMorph or TrackMorph can create snapshots (and morph on them) also for VST or AU plugin's as long as their parameters are "known" (exposed) to Live. This needs to be done before dropping PresetMorph or TrackMorph in the set.
You can set this up this by going into Live "configure" mode for the plugin:
1) Press [configure] on the docked device created by Live in the track for the VST/AU plugin (see picture below)
2) Touch or Move any VST/AU parameter you like to expose: on the plugin view in the track the parameter will be added.
3) Close [configure] when done.
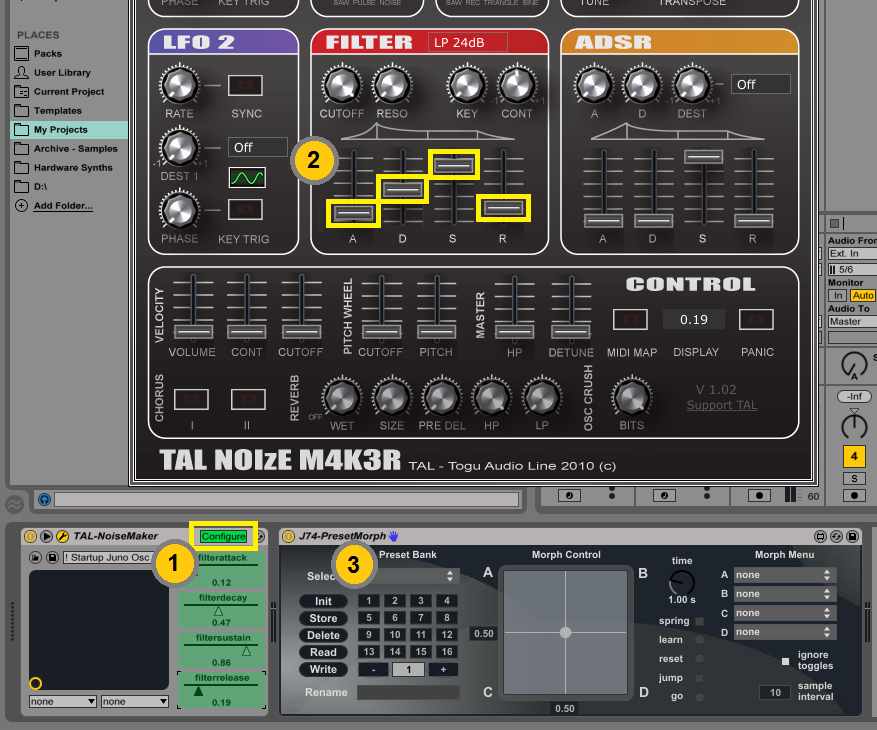
Proceed now as usual adding PresetMorph (or TrackMorph) and performing the store/recall/morph operations.
Important: if you wish to, you can save the VST/AU plugin with the exposed parameters as a "default configuration", so that the next time you load that plugin, parameters will be remembered and exposed automatically. Below a picture showing how to save "default configuration" for a VST/AU plugin.
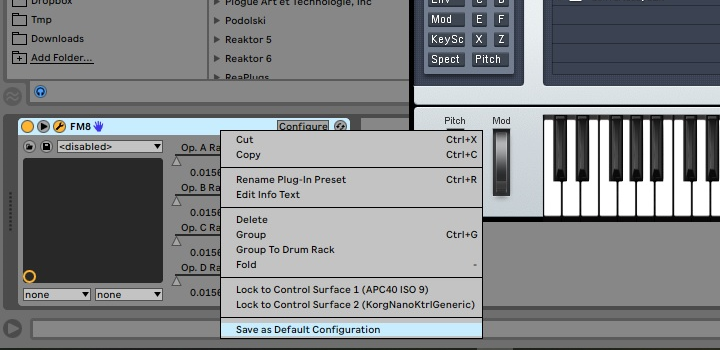
Note: an alternative approach, applicable in many cases (see limitations listed below), is to let Ableton Live automatically expose VST/AU plugin parameters by editing the "options.txt" option file of Live. This way it is possible to auto expose up to 128 parameters of any VST or AU plugin (the 128 limit is an Ableton Live limit for plugins, this is not related to the Morph device set). Detailed instructions on how to do so are provided by Ableton on the following blog/article:
https://help.ableton.com/hc/en-us/articles/6003224107292-Options-txt-file
Notes/Limitations:
- In Ableton Live versions 10.1 and above plugins with MORE than 128 parameters will NOT be auto-populated by this method, even if setting the options.txt.
- Max 128 parameters per VST can be automated in Ableton Live. This limits Morph devices interpolation to up to 128 parameters.
- Some VSTs use internal files (like samples). These are not parameters and cannot be automated in Live and consequently are not visible to Morph devices.
- Be aware that morphing with as many as 128 parameters can potentially be a heavy CPU task.
[4] - Why do I have audio dropouts and CPU spikes when trying to morph with TrackMorph or PresetMorph? Can I avoid this?
Dropouts and CPU spikes are possible if the target device (or devices) you are working on (for snapshots and morphing) have more parameters than your CPU can handle while morphing. Some plugins and devices have indeed lots of parameters (even hundreds sometimes). If you morph between snapshots of these devices, you keep on sending lots of parameter values in a matter of milliseconds, in a continuous matter (every movement of the XY handle sends the new changes). If the parameter values to be handled are too many for your CPU (and for the Max for Live engine), you may experience dropouts.
You can limit these effects: increase the setting of the "Sample Interval" on PresetMorph and TrackMorph (see picture below) to limit the refresh rate of snapshot morphing and reduce the CPU load. Anyway be aware that this will make morphing increasingly steppy (less smooth).

[5] - Can I do mixer automation with J74 Morph?
Only to a limited extent. Some Morph devices operate on a single device, some on a track and some on a set of sends. TrackMorph, for instance, takes a snapshot of a full track (all devices, volume, pan, sends level - with racks limited to macros) and allows you to interpolate (morph) between them, for performance and smooth transitions. But TrackMorph only works on a single track. You can of course add more TrackMorph devices, on multiple tracks, but the CPU load will increase with it.
[6] - Can I work with (instrument, effect or drum) racks?
Morph devices can only look at racks at the Macro level, not inside. Anything within the rack will not be visible to Morph devices. This limitation is necessary to avoid crashes in Live in case of recursive racks and dynamic parameter id mapping.
[7] - Is there a manual of the functionality for the J74 Morph devices?
Yes, it is included in the download package. Here also direct links on the web:
- TrackMorph
- PresetMorph
- SendMorph
- ParamMorph
- LFOMorph
- EnvMorph
- JoyMorph
- LoopMorph
[8] - What can be mapped/stored/morphed by Morph devices and what not?
As a general rule all parameters which can be MIDI mapped in Live can be controlled/morphed by the Morph devices (with the racks limitation explained above). This is true for most things in Live, but not for everything. For instance you cannot store settings like the sample loaded on a simpler/sampler or a clip name. You can store and morph settings for the MIDI mappable parameters of these devices.
[9] - Will my USB controller work with MorphJ and JoyMorph?
Most HID enabled USB devices should work with MorphJ and JoyMorph, but an exhaustive answer is impossible to give. Anyway it is very simple for you to check the compatibility by yourself, before purchasing the J74 Morph pack: download the free MorphJ device (from this link) and verify if your device can be supported.
Notes for Windows users:
Under Microsoft Windows certain devices (mostly pointers, mouses, keyboards, keypads) will not show up in MorphJ and JoyMorph. This restriction is set by the Microsoft operative system. The official statement of Microsoft on the matter is available here. The following equipment should instead work properly in JoyMorph and MorphJ under Windows: Joysticks, Gamepads, System Controllers. This limitation does not apply to the Mac OS environment.
Setup tips:
Different vendors typically have different "parameter numbers" assigned to sticks, axis and buttons. The Morph devices default to the typical assignment of popular Logitech gamepad sticks:
[X Morph] = assigned to Joystick parameter 0
[Y Morph] = assigned to Joystick parameter 4
You can change this to match the particular parameter number your USB control device sends by assigning [X Morph] and [Y Morph] to the specific parameter being sent. If you do not have documentation describing which parameter number are being sent by your USB controller you can use the [Test Input] feature of the Morph device. When [Test Input] is enabled the parameter number the USB control is sending will be shown on the Morph device. Assign this number to the [X Morph] or [Y Morph] parameters as you require.
[10] - Why on JoyMorph/MorphJ parameters move so sharply with my USB controller? Can I tune this?
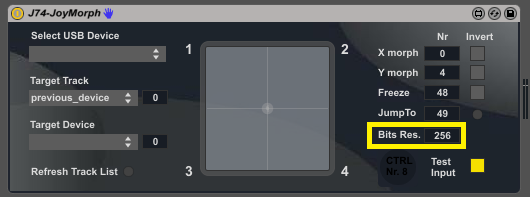
The JoyMorph uses the HID protocol to get the numbers generated by your HID USB controller. Most HID devices have a 16 bits resolution and should work fine with or JoyMorph/MorphJ by default. HID USB devices with lower resolution (like 8 bits) need some tweaking though. Try to decrease the parameter called "Bits Res." on the Morph device. The default value is 256 (16bits) and see if lower values get a better behaviour for your case.
[11] - I would like to re-use mappings and snapshots on a new liveset, can this be done without making new snapshots from scratch?
Yes, but only for the PresetMorph case. PresetMorph has a write to file / read from file functionality for saving/loading preset banks, a preset being a snapshot collected with PresetMorph. This will work as long as the target device is of the same type of the one originally used for creating the saved preset bank (that is: the bank was saved for an EQ8 originally and it is loaded by a new instance of PresetMorph mapped to another instance of EQ8, even if from different liveset). You can create this way a useful library of presets, to recall and morph from at any time.
Note: settings of the PresetMorph are still saved / recalled within the Liveset (no need to export for this to happen).

[12] - Do PresetMorph and TrackMorph work on return or master tracks?
Yes, PresetMorph and TrackMorph both work on any track, including returns, as long as they are correctly added to your liveset (see rules explained at Questions [1] and [2]).
[13] - Morph devices are audio devices: Can I morph MIDI devices with them?
Yes you can. To do this check the approaches described below and choose the one that provides the best fit to your specific case.
a) Simple option: just use TrackMorph
Let's say you want to have a full track, including MIDI devices, instruments and effects being "morphed". To achieve this simply use TrackMorph at the end of the chain (no MIDI routing needed). Every device, including MIDI devices, will be morphed (see picture below)

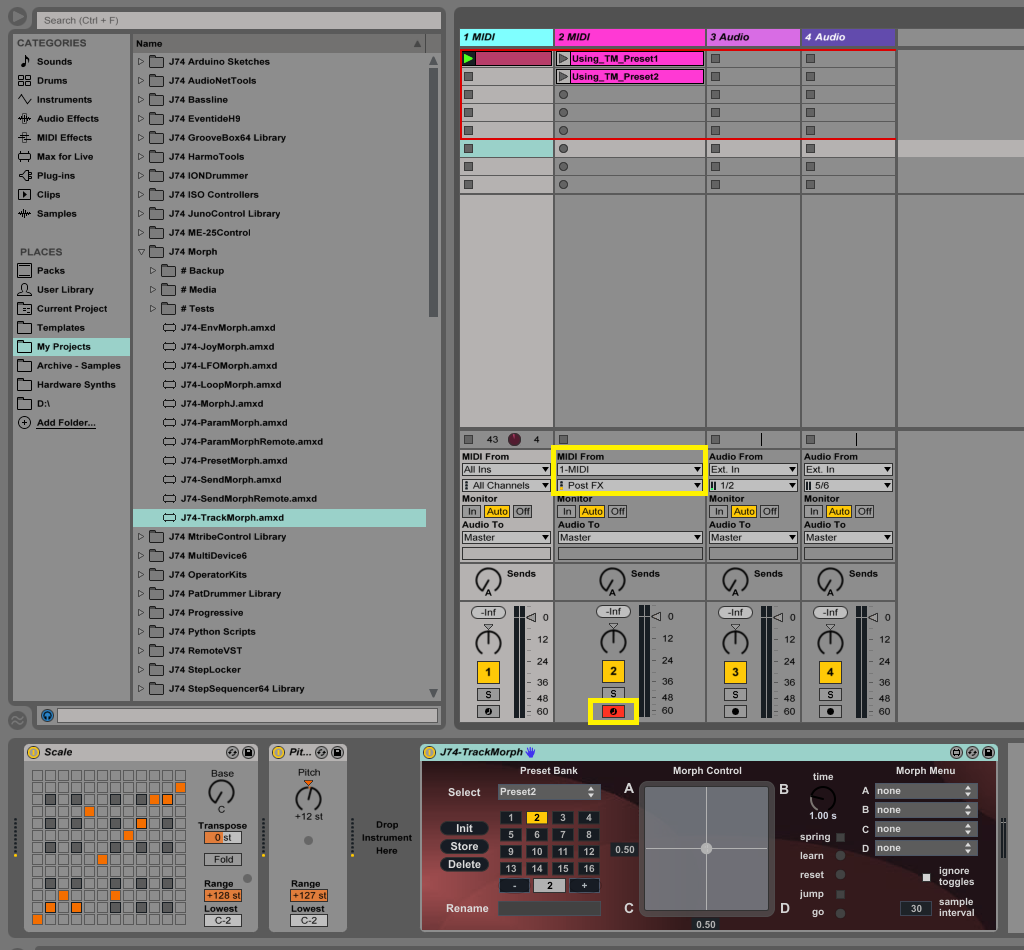
b) Advanced options with MIDI routing: all MIDI devices, with TrackMorph
Let's say you want to have only MIDI devices being morphed, not instruments and effects. For this create two tracks, as in the picture below: the first track has all the MIDI effects + Track Morph at the end (no instruments, no audio effects - apart Track Morph itself). On the second Track you will set all the other devices (the instrument and effects). To let MIDI arrive to the instrument you need to set [MIDI From] on track 2 to select the MIDI from track 1 (see picture). Finally arm track 2 (and eventually also track 1 if you need to). In alternative set track 2 to Monitor In. Anything in track 1 is subject to morph (= MIDI device only), while track 2 will not be morphed.
c) Advanced options with MIDI routing: only a specific MIDI device, with PresetMorph
Suppose you like to have only one specific MIDI device being morphed, nothing else. To achieve this use a similar construction as in the previous case, using PresetMorph instead of TrackMorph. Again use two tracks. Track 1 will only have the one MIDI effect you like to morph (plus PresetMorph at the end of the track). The second Track will have the rest of the chain (other MIDI effects, if you need them, plus instrument and any audio effect you like). As in the previous case you will set [MIDI From] on track 2 to select MIDI from track 1. Arm the track or set it to Monitor In. Only the one MIDI effect in track 1 will be controlled by PresetMorph.
Using variation of these concepts you can achieve pretty much any morph association you want.
[14] - Can you automate or sequence preset changes on Morph devices (like TrackMorph and PresetMorph)? How?
Yes, it can be done. To do this you need to automate the "scene select" parameter on the morph device (Track or Preset Morph). You can do it from the clip view / envelope tab or by clip recording the changes manually.
See picture below:
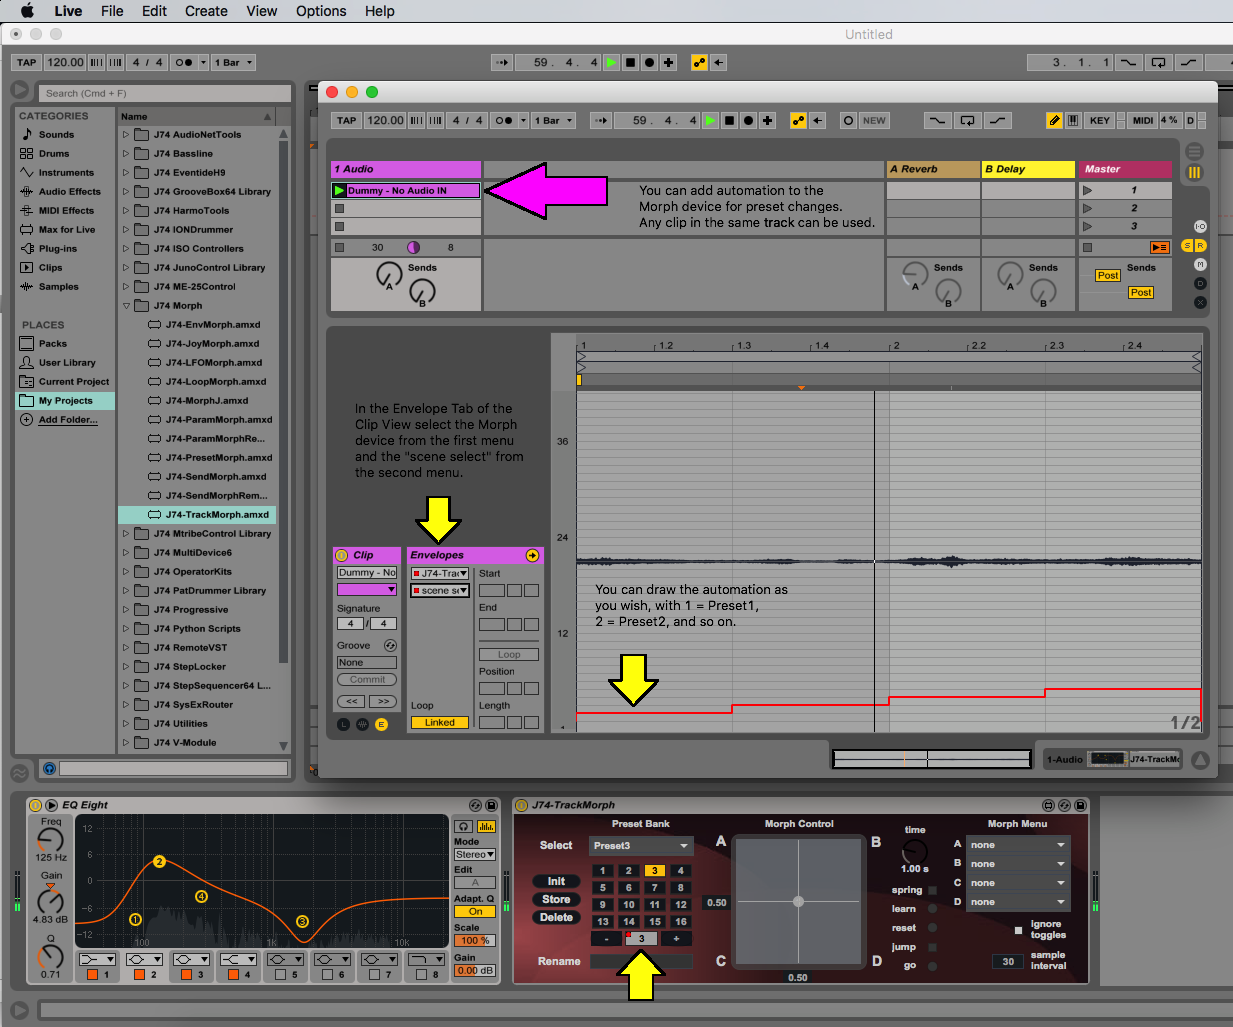
Note: timing for precise sequencing will be tricky to achieve. The time needed to load a preset depends on the CPU speed of your system (and the number of parameters involved). So there will always be some latency between the time in the clip you set a preset change and the time the preset is restored. You can compensate this in the clip by to anticipating the change, but the time to use will depend on your system and you will need to do some testing to get it just right.
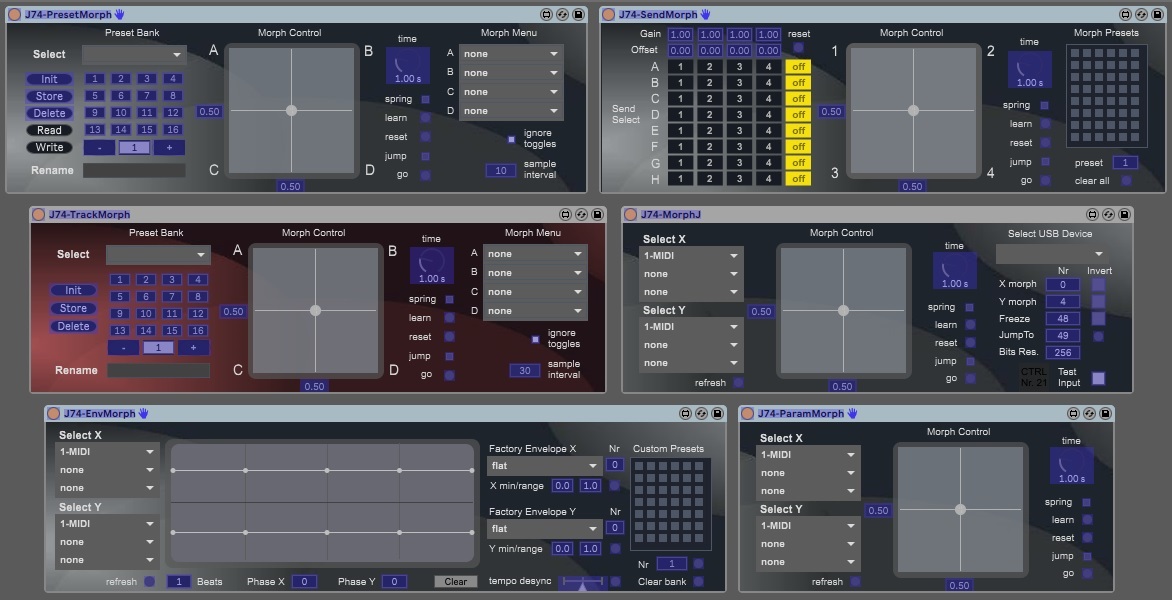
[15] - Can I MIDI map controls in Morph devices or use them with Ableton Push?
The Morph devices have their major controls MIDI mappable in Ableton Live. This means that:
- You can MIDI map these controls with any MIDI controller in Ableton Live
- You can automate these controls in MIDI or Audio clips using evenlopes
- If can you use Push to control these controls.
Below a picture which highlights in BLUE the parameters being MIDI mappable on each Morph device.
Still having issues?
If the answers above still do not solve your problem, please send an email to: info [at] fabriziopoce.com
In the email specify:
- System Type (Mac or Windows)
- System OS version (e.g. Windows 7 SP1 64bits)
- Ableton Live version (e.g. 9.2.3) and if 32/64 bits
- Max (for Live) version (e.g. 6.1.9)
If possible, please also provide a snapshot (picture) of the "Max for Live Console" message window. You can get this by right clicking on title of the Max for Live device in question (e.g. PresetMorph) and selecting "Open Max Window". Attach a screen-shot (picture) of this windows to the email.
Back to the J74 Morph main page